
Leica rangefinder rebuild and why you might need one...
- Alan Starkie
- Mar 1, 2020
- 6 min read
Updated: Apr 15, 2024
I often find myself explaining to clients that the work we do is slow and painstaking. We're
not really into doing quick servicing jobs, often referred to as 'CLA'. At the same time, I'm
not suggesting that everyone who advertises that they do CLA's do anything other than
first class work. I guess the problem is that when you get your camera back, it isn't always
easy to tell the difference. This post is designed to give you a bit of an idea of what needs
to be done when we service a camera with a blacked-out viewfinder and concentrates on
the work needed just to fix that fault. After that, the rest of the camera is serviced and
perhaps I'll post details of the rest of the work we do later.
The black-out happens because the beamsplitter prism that lies behind the eyepiece has
split into two parts. While it is cemented together with balsam of a similar refractive index
as the glass, you are essentially looking through a glass cube. After a knock, the balsam
can fail. Because the two halves are triangular, light can no longer get through due to total
internal reflection. The reason you can still see the secondary image and the framelines is
because they are reflected from the 45 degree face of the prism half, directly behind the
eyepiece.

We start by removing the rangefinder from the camera chassis, being careful to retain the
two small components that act as light seals. On an M3, there is an eyepiece either
attached to the rangefinder or the top plate, depending on the age of the camera and a
large thick window – really a prism, fitted behind the large VF window. This is held onto the
RF body by means of three epoxy pads. This has to be carefully removed as the glass is
particularly fragile.
The main prism is also held in place with epoxy pads but quite often these have shaken
loose by the time we get the camera. Unfortunately, the two halves of the prism can knock
together when this happens and the prisms can become chipped and damaged. We also
have to contend with other, less successful attempts at repair, which usually result in some
kind of damage.
Later versions of the M3 prism are made up of three components, and by prism, I mean
the two individual and roughly triangular prisms that are cemented together to form what
we call the main prism. In addition, there is a small plano-concave lens that is cemented
onto the front window of the main prism. Earlier versions have an achromat pair of lenses that are cemented onto the side of the prism (these are mounted separately in later models). So, an early M3 prism consists of five glass components.
Sometimes we have to break down all components if the beamsplitter is faulty but more often than not the main prism has split. All other remaining optics are removed and cleaned. The picture below shows the two prism halves with the concave lens still attached to one and the achromat pair attached to the other.

When dismantling the main prism, we also dismantle the achromat because the old cement will have yellowed by now. Everything is re-cemented using an optically clear, modern UV cure lens cement. In the picture above, you will also see the brightline mask which will be cleaned and reassembled. Internally, another prism – the delta prism will be cleaned, as well as the telescope unit, which houses a tiny lens assembly and also the roof prism which has its own tiny plano-convex lens attached. We remove this lens, clean and re-cement because the old canada balsam will have become quite cloudy by now.
The optical surfaces of the main prism is finely polished on a lap.

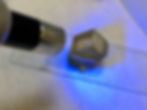
On this particular job, we found three tiny chips on the hypotenuse of the prism that holds the beamsplitter. The chips were very small but deep, we decided not to grind down the surface because this could result in a loss of optical performance plus they were very small and wouldn't be in any plane of focus when in use. Once the beamsplitter prism has been polished and cleaned, it is ready for the beamsplitter to be applied. The beamsplitter is a semi-reflective layer of silver applied to the hypotenuse of the prism, closest to the eyepiece. Its purpose is to mix the image from the small rangefinder window ( the RF patch) and the framelines along the axis of the main viewfinder image. Even where the prism hasn't come apart, sometimes the beamsplitter may have deteriorated, in which case we still go through the same procedure. The density of the silver layer is critical. Too little and the RF patch isn't clearly visible. Too much and the RF patch is very bright but the viewfinder will be quite dim, making use in low light very difficult. We deposit the silver in an argon atmosphere, in a vacuum chamber. The process is called sputter coating, whereby the silver is laid down atom by atom utilising high voltage plasma discharge. Prior to this, we use a process to plasma clean the surface and also lay down a very fine surface of aluminium prior to the silver. Getting this even slightly wrong will result in a failed beamsplitter. The sputter coating operation can be seen below.

After applying the beamsplitter, the two prism halves are carefully aligned and partly cured before full curing using a powerful UV light source.
The next step is to secure the concave lens to the front of the main prism. The position must be precise, otherwise the main prism won't fit into the rangefinder body.

The next step is to align the achromat pair, part cure them then fully cure under UV light.

We then carefully align the achromat onto the main prism. This is where the RF patch part of the system is fed through to the beamsplitter. Any misalignment here means that the alignment of the RF patch will be wrong. If any mistakes are made, the entire assembly needs to be taken apart, which means soaking in chlorinated solvents and sometimes this can take two or three weeks to work!
After cementing the achromat to the main prism, it is painted matt black and is ready to be fitted to the rangefinder body.

That may seem the end of it dear reader, but we usually end-up doing more than is absolutely necessary. On this job, we decided to remove the roof prism (precisely factory set) and re-cement the tiny lens onto the tip of the prism. This feeds the RF image through the tiny rectangular window of the brightline mask. If the old balsam is old it can degrade the RF image quality. On this model, there is also a pentaprism that sits just behind the small RF window. If that is comprised of two parts, we usually re-cement that while we're in there.

Now comes the fitting of the prism back into the rangefinder body. This is done on a jig and it allows us to make sure we've got correct alignment. Set it in the wrong position and you might find that correct vertical and horizontal alignment is impossible. The roof prism unit is fitted and aligned. The brightline mask is cleaned, repaired most likely – usually something is sticking or not working correctly. If the brightline mask is in poor condition, we have the option to replace it with our own FtA mask which is made without the glass and balsam of the original. If we're happy with the condition of the original part, we usually advise to leave the original mask in place.
Anyway, once we're happy, we secure the prism, along with the freshly cleaned and edge painted front window into the rangefinder body.

So, if your camera requires a rangefinder rebuild, you can see why we charge an additional £155 on top of the service charge (2020 prices). It equates to less than one hour of Leica's hourly rate. Often, we run into problems that require extra work but the price remains the same. Of course, where the rangefinder is okay, we still strip it down to clean and calibrate it as part of our full service package, at no extra cost. Quite often this can dramatically improve performance. Other times we may feel that maybe the achromat may need re-cementing (if mounted separately on later cameras), or the small lens on the roof prism or even the pentaprism, if in two parts would benefit from new optical cement, many times we just get on and do it, again for no extra charge. By the time the M2 came along, the rangefinder design changed quite a lot. The main prism is quite a lot bigger and I think that greater mass leads them to separate when dropped much more easily than the M3. The M2 rangefinder design has changed little over time and is still used today.
UPDATE November 2022. Soon we hope to be able to replace M3 prisms with brand new components. The high refractive index flint glass of these prisms make them very fragile. Quite often what we have to work with are chipped and cracked. We will make an announcement in due course.
